After sales support is the primary aspect of acon calibration and instruments trading’s market strategy, since the goal of the company is the proper and effective use of the products and services provided. We aim at a continued relationship with all our customers throughout the life cycle of the product purchased. Our statement is that through a cost-effective and reliable after sales service we manage to ensure full client satisfaction as well as the maintenance of our high level of sales.
Below is After Sales Service for our Brands

Infrared Camera Calibration
FLIR cameras are designed and factory calibrated for accurate temperature measurements and thermal imaging. When maintained with FLIR’s annual calibration services, they will be highly reliable in spotting thermal anomalies and other temperature phenomena. Without proper maintenance and calibration, accurate measurements cannot be assured.
The calibration of each FLIR camera model is unique. Therefore, FLIR’s Aftermarket Organization is uniquely qualified to keep your camera in peak operating condition for optimum reliability and accuracy in data collection. This division is certified according to ISO 9001:2015.
14-Point Inspection & Calibration Program
FLIR´s exclusive 14-Point Inspection & Calibration program uses temperature references that are calibrated annually and traceable to the SP Technical Research Institute of Sweden, and the National Institute of Standards and Technology (NIST). The program includes the following steps:
FLIR 14-Point Inspection & Calibration Program:
- Perform a complete operational check
- MSX® calibration and laser alignment, when applicable
- Verify all internal cable and PCB connections
- Clean viewfinder and check optics
- Upgrade internal camera software to latest revisions
- Perform minor repairs
- Verify and/or re-equalize as needed each temperature range for image uniformity
- Verify standard lens calibration (others or special engineered lenses, optional)
- Verify ambient temperature compensation as needed
- Re-calibration to ensure it meets factory specification
- Calibrate temperature ranges up to +1,500°C, when applicable
Perform quality approved acceptance test procedure
Provide calibration label with next due date
- Provide calibration certificate (optional, extended calibration certificate with measured values)
*Does not include parts or labor required to meet calibration standards, nor additional lens/filter calibrations.

Secure your investment
LPKF is renowned for worldwide leadership in designing easy-to-use, world class laser products specifically tailored to customer needs. From this leadership vantage point, LPKF is uniquely able to provide customers with worldwide premium customer support.
Service Packages
The entry level
- Fast response time for minimizing downtime of your machine
- Qualified support via e-mail and phone
- Remote support free of charge
The next step
- Probability of failure decreases significantly
- Preventive maintenance secures your investment
- Easy planning with scheduled maintenance
- Basic package included

The comprehensive package
- Full service and complete cost control
- Highest uptime of your machine
- Warranty up to 10 years possible
- Basic and Classic package included
Important parts of your success
No matter whether you produce in Europe, America, or Asia – highly qualified LPKF service technicians are there for you across the globe. Whether you need personal service on site or remote support over the phone or by email – you can count on receiving competent support.
- We are there for you around the world and will quickly resolve even the most challenging cases for you
- Prompt support plus rapid analysis and response times thanks to a standard global communication system
- All LPKF service technicians around the world are given further training according to a uniform standard
We will provide you with professional commissioning for your investment. With first-rate training, you will be able to exploit the full potential of the laser systems. Choose from among an extensive assortment of operator, programming, and maintenance courses. Guarantee that your expertise is one step ahead and respond flexibly to new challenges from your customers at all times.
- We carry out initial installation and even relocation
- Our wide assortment of training programs accommodates both beginners and experts
- An ideal blend of theoretical and practical training ensures that the knowledge conveyed will be longlasting
- Experienced lecturers, perfectly equipped seminar rooms, and hands-on machine training
You need to be able to profit from a high level of machine availability and system precision, which is why we offer preventive maintenance and calibrations.
- Documented preventive maintenance is a basic element for ensuring a long service life for your system
- Calibration with highly precise calibration tools, after which a certificate is issued
It is important for your investment to pay off in the long run. Original spare parts from LPKF will help you achieve this. With LPKF spare parts tailored to your product, your production process will be reliable, efficient, and precise.
- Worldwide service hubs and spare parts warehouses
- Speedy delivery you can count on
- Reliable function of LPKF spare parts
- Support provided by our LPKF experts from selection to installation
You can always rely on our support, which will continue to serve you for years to come. Whether your goal is to create the best conditions for successful production or to put your LPKF products to optimum use and flexibly adapt them to changes, we will work together to find long-lasting ways for maximizing your added value. As your partner, we will support you with coordinated solutions and service packages to keep your production economical and running at a constantly high level.
- When it comes to optimizing processes, adapting applications, and getting the most out of your setup, our experts will be happy to assist you.
- Stay one step ahead with professional LPKF upgrades
- Respond quickly and flexibly to changes on the market
- Invest in upgrades to lower your costs and become more profitable

Tektronix Calibration Capabilities
Equipment calibration for all instruments and industries
As the world’s leading provider of multi-brand calibration services, we calibrate more than 140,000 instruments from 9,000 different manufacturers. We provide standard and accredited cost-effective calibration services to keep your equipment running in top condition.
Calibration services by instrument type
Our experienced technicians and specialized equipment are ready to calibrate instruments of the following types:
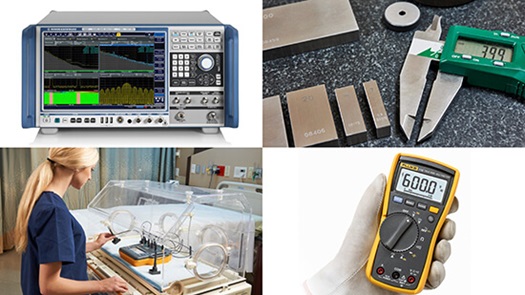
- Avionics Calibration
- Electrical / Electronics Calibration
- Force Calibration
- Humidity Calibration
- Medical Equipment Calibration
- Telecom Calibration
- Pipette Calibration
- Pressure Calibration
- Sound Calibration
- Thread Gauge Calibration
- Communications Calibration
- Fiber Optic Calibration
- Flow Calibration
- Gauge Calibration
- Logic Analyzer Calibration
- Oscilloscope Calibration
- Physical / Dimensional Calibration
- Precision / Mass Calibration
- RF / Microwave Calibration
- Temperature Calibration
- Torque Calibration
Calibration capabilities by industry
We also provide expert calibration and equipment certification services to a wide range of industries. Our services can be tailored to meet every client’s specific requirements. We have made significant investments and developed core expertise in a number of industries requiring specialized equipment. We offer calibration services for the following industries, and more:
- Aviation and Aerospace Calibration
- Defense Calibration
- General Manufacturing Calibration
- Medical Equipment Calibration
- Semiconductors & Electronic Calibration
- Automotive Calibration
- Communications Calibration
- Energy Calibration
- Government Calibration
- Life Sciences Calibration
- Pharmaceutical Calibration
Cloud-based Calibration Certificate Storage Included with Calibration Service
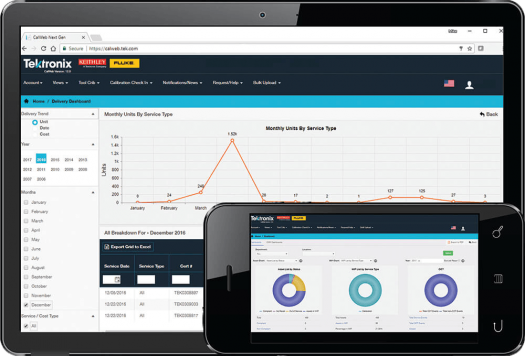
Manage Complex Calibration Environments with CalWeb
- One-Stop Shop for Managing your Calibration Program
- Compliant with the FDA’s 21 CFR Parts 11 and 820
- Cloud-Based with Flexible Configurations
- Multi-layered Security
- Excellent Reliability with 99.5% Uptime
- Intuitive User Interface
- Mobile Device Support
- Global Support in 10 Languages

Why Do You Need to Calibrate Your Noise Measurement Equipment?

If you are using your noise measurement instruments to meet any Standards, Regulations or Guidelines, it is essential that your equipment is measuring accurately. Most modern standards, regulations of guidelines will clearly state the standards to which the equipment must comply.
For example, ISO 11202:2010 states:
“The instrumentation system, including the microphones, cables, and windscreen if used, shall meet the requirements of IEC 61672-1:2002, class 1, and the filters, if relevant, shall meet the requirements of IEC 61260:1995, class 1.”
and similarly, BS 4142:2014 states:
“Select systems for measuring sound pressure levels, including microphone(s), cable(s), windscreen(s), recording devices and other accessories which conform to BS EN 61672-1, Class 1, for free-field application, as appropriate. Filters, where used, should conform to BS EN 61260, Class 1, and sound calibrators to BS EN 60942, Class 1.”
If you are going to continue to use your noise measurement instruments over a long period, it is vital that they continue to meet these same standards and this is why calibration, both Field Calibration and Periodic Verification, are an essential part of undertaking noise measurements.
Why is Calibration Important?
Examples of why the calibration of noise measurement instruments is important include:
- When the information collected is to be used for legal purposes (for example to show compliance with occupational noise standards such as the Noise at Work Regulations or OSHA’s 1910.95)
- Where the measurement data is to be used to select hearing protection or noise control products
- Where the information is to be used for environmental compliance or for a planning application
This is not an exhaustive list but demonstrates why it is important that noise measurement instruments are calibrated regularly and you are confident that they are measuring accurately.
A sound level meter (or any noise measurement instrument) should be calibrated otherwise it can be very difficult to show traceability when the measurements are challenged now or in the future.
If I was looking at your noise measurements, the first thing I would ask (even before looking at the measured levels) would be “Did you calibrate the equipment before and after the measurement?” and then “When were the sound level meter AND the acoustic calibrator last calibrated by a suitable calibration laboratory?”
If there’s no evidence that the equipment has been calibrated before the measurements were made and that all of the equipment had been calibrated to a suitable standard, the measurements could be called into question.
What is Calibration?
When we are talking about the calibration of a noise measurement instrument, a sound level meter in this instance, there are effectively two types.
The first, field calibration, is what you would carry out before (as possibly after) each measurement using a reference acoustic source such as an acoustic calibrator.
The second is what we will refer to as Recalibration or more correctly Periodic Verification. This is the process that your instrument will undergo when it is returned to a calibration laboratory (when you send your equipment to Cirrus for example).
What is Field Calibration?
Each time your instrument is used it should be calibrated using an Acoustic Calibrator before and after each measurement to check that it is working as correctly. This is field calibration.
We also often get asked why an instrument needs to be calibrated every time it is used when you have a certificate of calibration.
A sound level meter or noise dosimeter is a precision instrument and so should be treated with care. Any damage may not be immediately obvious and so using an Acoustic Calibrator before you make any measurements helps to check that the instrument will measure correctly.
However, using an Acoustic Calibrator only checks one level and one frequency. Therefore, regular calibration (or Periodic Verification) is essential to ensure that all of the features and functions of your instrument are working as intended by the manufacturer.
What is the Difference between Field Calibration and Periodic Verification?
These two things are very different and provide you with very different information.
Field Calibration
A field calibration is a simple check of the instrument that checks it against a known level (usually 94dB or 114dB) at a known frequency (usually 1kHz) using an acoustic calibrator.
The limitations of a field calibration are that it is only checking the performance of your instrument at a single point, whereas when you are undertaking a real noise measurement, your instrument will be recording a wide range of frequencies and levels which are combined to provide the noise parameters that you need.
Your sound level meter will often be measuring a number of acoustic parameters such as LAeq and LCPeak (and possibly many more such as octave bands and Ln values if you are measuring environmental noise).
A field calibration does not check all of these functions and it does not check the performance of the the most critical component on your sound level meter, the microphone, at a range of frequencies.
Therefore, a field calibration is simply a way of confirming that the instrument is functioning at that specific reference point. Typically, the only information recorded is the time, date, level and any offset from the previous calibration, nothing more.
Periodic Verification or Recalibration
This is very different to field calibration as it requires a much more extensive range of tests and performance checks to be made and is usually only carried out in a calibration laboratory that has the correct equipment and expertise.
Note: Please be aware of low cost calibration that some companies provide that may only be carrying out the same checks that you would do during a field calibration.
This is not sufficient to meet the demands of standards such as the Control of Noise at Work Regulations and would not be acceptable evidence of calibration if your measurements were ever challenged or subject to scrutiny.
Always check what you are getting when you are paying for the calibration of your equipment and ensure that it meets the requirements of any standards or regulations that you are working to.
If you are sending your equipment to a calibration laboratory, always check that they are capable of providing the level of calibration that you need.
What do we mean by this? Modern sound level meters are sophisticated instruments and so require a level of understanding from a calibration lab that is often not found in labs that are not noise specialists.
Some noise measurement instruments require specialist tools or software and these are often not found outside of the manufacturer or a few, specialised calibration laboratories.
The Periodic Verification (or Recalibration) of a sound level meter should be done, where possible, by removing the microphone capsule and testing the instrument electrically.
The microphone capsule should be tested using either a multi-frequency acoustic calibrator (a very expensive item) or an electrostatic microphone calibration system (also rather expensive!).
When both the sound level meter and the microphone capsule have been tested and verified, they should be recombined and the final calibration carried out.
This may sound like a long process and it is but it’s the only way to confirm that the entire instrument is working as it was when it was new.
To give an example of what happens at Cirrus, when an Optimus sound level meter comes into our calibration lab, the microphone capsule is removed and checked using our reference electrostatic calibration system. This tests not only the frequency response of the microphone over a wide range, it also tests a range of different levels and the absolute sensitivity of the microphone (using an external reference source). Only if the microphone capsule passes all of these tests is it deemed acceptable to be used with the sound level meter.
The whole instrument is then passed into the calibration area where it is subject to a battery of tests (essentially the same tests that we do when we made the instrument) to check that it still meets all of the performance points that it did when it was new.
These tests check many aspects of the instrument such as the accuracy of frequency and time weightings as well as the linearity over a wide range of levels. This checks if the instrument measures with the same level of accuracy at low levels as it does at high levels, something that is essential if you are using your instrument for both environmental and occupational noise measurements.
Only when all of these tests (and there are lots of them) do we consider the instrument to be calibrated and fit to go back into use, accompanied with a certificate of calibration.
This may seem a lot of information to consider but it is vital that your noise measurements instruments are measuring correctly and that you are getting reliable, accurate results.
If you have any questions about the calibration of your equipment, please contact us and we will be pleased to help.


